Install and start IHP on NixOS

1. Install nix.

Nix already installed in Nixos, so no further action needed.

2. Install IHP

2.1 Method 1

nix-env -f https://ihp.digitallyinduced.com/ihp-new.tar.gz -i ihp-new

2.2 Method 2

cd ~/Projects/ihp-blog
#nvim default.nix
#…

3. Create New IHP Project

mkdir ~/Projects/ihp-blog
cd ~/Projects/ihp-blog
ihp-new blog3

4. Start The New Created IHP Project

cd ~/Projects/ihp-blog/blog3
./start

5. Access the Web Page

#Open URL http://localhost:8000 in web browser

Toggle Touchpad Enable & Disable

Here is my simple script to help me toggle touchpad enable & disable in NixOS running on Thinkpad R61.

~/bin/toggleTouchpadEnableDisable

# Try disabling the libinput device.

d=`xinput list | grep -i touchpad | awk '{for(i=1;i<=NF;i++){ tmp=match($i, /id=[0-9]/); if(tmp){print $i} } }' | awk --field-separator== '{ print $2 }'`
echo 'xinput list'
echo " SynPS/2 Synaptics TouchPad device ID: $d"

# Find the touchpad, in my case it's called "SynPS/2 Synaptics TouchPad", with ID 11.
echo "xinput list-props $d"
de=`xinput list-props $d | grep 'Device Enabled' | awk '{ print $3}' | awk --field-separator=\( '{print $2}' | awk --field-separator=\) '{print $1}'`
ds=`xinput list-props $d | grep 'Device Enabled' | awk '{ print $4}'`
echo " Device Enabled setting ID: $de, Device Enabled status: $ds"

newStatus=0
if [ $ds == 0 ]; then
 #echo "Set new status to: $newStatus"
 newStatus=1
elif [ $ds == 1 ]; then
 #echo "Set new status to: $newStatus"
 newStatus=0
fi

# There should be one called 'Device Enabled'; at least mine has.
echo "xinput set-prop $d $de $newStatus"
xinput set-prop $d $de $newStatus

ds2=`xinput list-props $d | grep 'Device Enabled' | awk '{ print $4}'`
echo " Device Enabled setting ID: $de, Device Enabled status: $ds2"


dvorak keyboard

Today is the first day I learn to touch-type with ‘dvorak’ keyboard layout.

Training Requirement

For training, just use current ‘qwerty’ keyboard, and proceed to https://learn.dvorak.nl/.

Ignore what’s printed on physical ‘qwerty’ keyboard keys would help 😛

Training

I do training touch type dvorak at https://learn.dvorak.nl/.

How to change keyboard Layout on Windows

For Windows (I am using Windows7), to configure for switch keyboard layout between ‘qwerty’ and ‘dvorak’, please look at look in Regional and Language Options > Keyboards and Languages > Change keyboards…
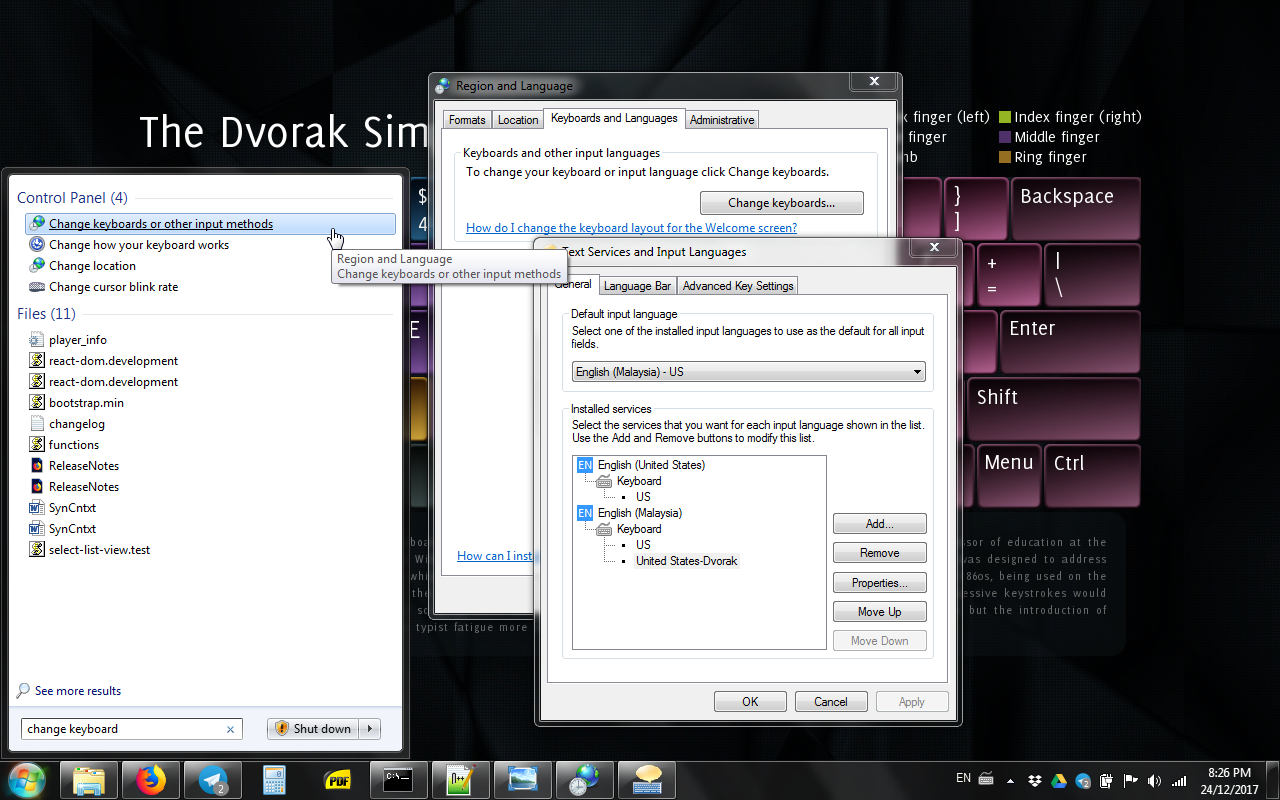
2017-12-24 20_24_24-Greenshot-changeKeyboardLayoutQwertyDvorak

Then, to switch between those keyboard layout, we can select the keyboard layout from ‘Language Bar’ icon at bottom-left screen corner. The setting for keyboard layout are by application basis. That’s mean each application have it’s own keyboard layout.

2017-12-24 20_24_24-Greenshot-changeKeyboardLayoutLanguageBar

How to change keyboard Layout on Linux

For Linux (I am using NixOS),  we can use two commands to switch keyboard layout in X and another two commands to switch keyboard layout in console.

When in X, run below command. The setting will effect all application in X.

  • setxkbmap dvorak
  • setxkbmap us

To display current keymap, use command ‘setxkbmap -query’.

When in console, run below command. The setting will effect all application in console.

  • loadkeys dvorak
  • loadkeys us

A tip to easily and quickly switch keyboard layout mapping in Linux

Windows quite good IMHO as it provide ‘language bar’ for easily switch keyboard layout mapping.

For Linux, we can do a little trick to make the switching keyboard layout in X a little bit easier. For example, just need to add two lines aliases to ~/.bashrc file as below:

  • alias asdf=’setxkbmap dvorak’ # to switch to dvorak in X
  • alias aoeu=’setxkbmap us’ # to switch to qwerty in X

The we just need to enter same four left-fingers home keys (‘asdf‘ when currently using qwerty; and ‘aoeu‘ when using dvorak) to switch between those two layout mapping.

Do the same little trick to make the switching keyboard layout in console a little bit easier. For example, just need to add two lines aliases to ~/.bashrc file as below:

  • alias lkj=’loadkeys dvorak’ # to switch to dvorak in console
  • alias nth=’loadkeys us’ # to switch to qwerty in console

The we just need to enter same four right-fingers home keys (‘lkj‘ when currently using qwerty; and ‘nth‘ when using dvorak) to switch between those two layout mapping.

To set default keyboard layout to dvorak in NixOS

Add those line in ‘/etc/nixos/configuration.nix’:

  • i18n.consoleKeyMap = “dvorak”; # for terminals
  • services.xserver.xkbVariant = “dvorak”; # for graphical

And then run rebuild with command ‘nixos-rebuild switch’.

GoboLinux 016

This is my note while trying with new release GoboLinux 016 inside VirtualBox.

GoboLinux VM VirtualBox configured as below:

  • KVM
sudo su -

Xorg -configure
 cp xorg.conf.new /etc/xorg.conf

vim /etc/xorg.conf
 Section "Device"
 # Driver "fbdev"
 Driver "vesa"

reboot

ip addr ls
 dhcpd enp0s1
updateRecipes
 cd /Data/Compile/Recipes
 find . | grep -i tmux

tmux
https://github.com/tmux/tmux/releases/download/2.3/tmux-2.3.tar.gz

NewVersion Tmux 2.3 https://github.com/tmux/tmux/releases/download/2.3/tmux-2.3.tar.gz
 Compile Tmux 2.3
vim /System/Settings/Compile/Compile.conf
 compileRecipeAuthor="Muhammad Najib Bin Ibrahim <mnajib@gmail.com>"

ContributeRecipe Tmux 2.3

#scp najib@tomato:~/.tmux.conf

If have broken links from previous installation attempt, try run this prior to Compile:

$ find /System/Index | RemoveBroken

To install package:

SuggestUpdates
InstallPackage -b -C Qt


My OS Watch List

Berikut adalah senarai opensource OS yang menarik perhatian Cikgu.

  • NixOS
  • GoboLinux
  • ReactOS
  • FreeBSD
  • Android-x86


nixos-logo-only-hires

NixOS (http://nixos.org) ialah distro Linux dengan pendekatan unik untuk pengurusan pakej dan konfigurasi. Dibina di atas pengurus pakej nixpkg, ia benar-benar perisytiharan, menjadikan sistem penaiktarafan boleh dipercayai, dan mempunyai banyak kelebihan lain.


gobo-logo

GoboLinux (http://www.gobolinux.org/) dan NixOS (http://www.nixos.org/) adalah antara OS yang paling Cikgu teruja. Ini adalah kerana Cikgu sangat tertarik dengan idea kaedah filesystem dan package manager.

NixOS dan GoboLinux pada umumnya bertujuan menyelesaikan masalah kebergantungan antara perisian dengan pelbagai versi, tapi dengan pendekatan atau kaedah berlainan. NixOS membezakan setiap versi perisian dengan gabungan ‘hash dan nama perisian sebagai nama direktori’, manakala Gobolinux membezakan setiap versi perisian dengan ‘nombor versi sebagai nama direktori’.


reactos_0

Opensource OS yang seterusnya ialah ReactOS (http://www.reactos.org/). ReactOS merupakan operating system yang serupa cara kerja Windows. Secara umumnya, pengguna boleh secara terus menggantikan Windows dengan ReactOS. Buat masa sekarang ReactOS masih lagi dalam proses permulaan pembikinan dan berstatus ‘beta’.

gobolinux: New Major Release

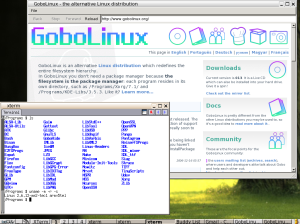
GoboLinux 015, the new major release of GoboLinux.

gobolinux-screenshot-ARM_003_Lucas

GoboLinux, the Linux distribution featuring a rethought file system structure. This is the first full-system image release in a number of years, after a long period in which we kept only updating compilation recipes. Packages were built using both ALFS (Automated Linux from Scratch) and our custom dynamically-generated sandboxed environment which insulates the source code and its dependencies during compilation. Major upgrades include the Enlightenment 18 desktop and kernel version 3.14.2, as well as new versions of the GoboLinux management tools. Please check the Release Notes for details and download instructions.

Refer: http://gobolinux.org/

Sony-Ericsson Xperia X8

Tested on
Sony Xperia x8 (e15i)

[[Picture]]

*remove sim card from phone
*backup sd card

———————————–
Download & Install Required Software on PC
———————————–

  • fastboot driver for Windows?
  • adb driver for Windows?
  • sony pc companion.
  • superoneclick.
  • recoverx
  • need internet connection (wifi prefered).
  • need usb-.. cable.

———————————–
To reinstall to stock rom/…
———————————–

  1. recharge battery to more than 80% full
  2. use sony pc companion, repair
    support zone > start
    software update > start
    repair my phone/tablet
    select phone model: x8 (e15) > next
  3. turn phone off > remove battery
  4. disconnect usb cable (if connected)
  5. push an hold ‘start/power’ phone button for 4 seconds …
  6. wait 10 seconds …
  7. add battery
  8. while press and hold ‘back’ button, plug in usb cable from pc to phone.
    hold the ‘back’ button until green light appear at phone indicator.
    The installation now will continue.
  9. reboot the phone.
  10. configure date/time, timezone, time/date display format.

———————————–
To rooting & install superuser
———————————–

  1. start phone.
  2. setting > applications > development > enable/allow usb debuging.
  3. connect phone-usb-pc.
  4. at pc; you might need to turn-off ‘anti-virus’.
  5. at pc; superoneclick > general > root.
  6. click ‘yes’ to install busybox.
  7. reboot phone.
  8. superoneclick > general > sheel root.
  9. reboot phone.

———————————–
To install cwm recovery
———————————–

  1. on pc; start recoverx.
  2. select your phone brand: sony ericsson.
  3. select devie: xperia x8.
  4. select ‘cwm-based recovery 3.2.0.0’.
  5. do not select ‘developer mode’ (this function is for the recoveryx software
    developer).
  6. click ‘next’ button.
  7. when download complete, wait until it prompt to click ‘next/continue’;
    connect phone usb to pc, and then click ‘next/continue’.
  8. it will continue with installing cwm recovery to phone.
  9. click ‘exit’.
  10. reboot phone.

*You may need to apply all this steps again if you cannot go to cwm recovery mode.

  • On pc; you might need to re-enable / turn-on anti-virus.

———————————–
Configure standard keyboard (chinese keyboard, touchpal version)
———————————–

For ‘default input’ keyboard?:

  1. setting > language & keyboard > default input > quick text setting >
    spelling correction > off.
  2. setting > language & keyboard > default input > quick text setting >
    disable ‘quick fixes’.
  3. setting > language & keyboard > default input > disable ‘vibration on
    keypress’.

For ‘chinese keyboard’:

  1. setting > language & keyboard > chinese keyboard >
  2. portrait keyboard > full qwerty.
  3. disable ‘predict next word’.
  4. enable ‘slide-down symbols’.
  5. Do NOT select ‘Quick text’ in ‘English Input Method’.

For ‘TouchPal X’ keyboard:

To set default keyboard to ‘Chinese keyboard’:

  1. While on any text input box, do long press. And then choose ‘Input Method’ where you will see the ‘Select input method’ option.
  2. Choose the input method you want, in this example ‘Chinese keyboard’.
  3. Done.

———————————–
To enable wifi
———————————–

  1. Settings > Wireless & networks > Wi-Fi settings.
  2. password/key/…

To disable Wi-Fi auto-sleep:

  1. Settings > Wireless & networks > Wi-Fi settings.
  2. Press ‘option’ button.
  3. Select ‘Advanced’.
  4. Wi-Fi sleep policy > Never.

———————————–
To make backup (goto to CWM recovery mode) – partitioning scard and then creat
(full) nandroid backup
———————————–

  1. shutdown phone.
  2. remove battery.
  3. hold phone power button to make sure power drain.
  4. add battery.
  5. push start/power button.
  6. hit ‘back’ button multiple times (after first logo (sony ericsson) eppear, until CWM load).
  7. advance > partition sdcard > 256M > 32M. That will create two partition for sdcard.
  8. advance > partition sdcard > 1024M > 0M. That will re-create two partition for sdcard.
  9. create backup; backup & restore > backup.
  10. restart/reboot phone ‘reboot system now’.
  11. connect phone-usb-pc.
  12. on phone; turn on usb storage.
  13. from pc; copy nandroid backup at directory ‘clockworkmod/backup/*’ to laptop/pc.

———————————–
To also use sdcard for application
———————————–

  1. market; sign-in with google account.
  2. market: update ‘superuser’.
  3. market – install ‘link2SD’.
  4. open ‘link2sd’.
  5. allow.
  6. ext2.
  7. reboot device.

*”cannot create mount script? ext2… unupported by os?…”
If this happen, try do this steps in CWM Recovery mode:

  1. advance > partition sdcard > 256M > 32M.
    that will create two partition for sdcard.
  2. advance > partition sdcard > 1024M > 0M.
    that will create two partition for sdcard.

Basically we need the size for those two steps should be different, with the last step be the final/target size we want.

Then recreate mount script in link2sd.

???????????????????????????????????
?? market – install ‘busybox free’
?? busybox – install/update busybox
?? this will coz installed cwm broken
???????????????????????????????????

———————————–
Else
———————————–
– disk info
– wechat
– mysolat
– whatsapp
– private diary free
– battery doctor
– file explorer: root browser
– whatsapp

– js terminal emulator

– text editor:

– keyboard: touchpal x …
configure touchpal keyboard: …

? myteksi

To switch-off auto-change display orientation:

  1. Settings > Sound & display settings > Display settings > Orientation > Untick the box.

To change screen timeout:

  1. Settings > Sound & display settings > Display settings > Screen timeout > Select 1 minute.

———————————–
Before deliver
———————————–

  • —cwm;-delete-data-&-cache-/-factory-reset?—
  • – using link2sd?; market: delete cache & delete data